· 7 min read
Zach Probst

In the release notes for Nodestream 0.12, we mentioned that we had added support for migrations. This is a feature that we have been wanting to add for a long time, and we are excited to finally have it in place. In this post, we will discuss what migrations are, why they are important, and how they work in Nodestream.

Evolutionary Database Design

Evolutionary database design is the idea that the database schema should evolve over time as the application changes. This is in contrast to the traditional approach of creating a fixed schema at the beginning of a project and then never changing it. With evolutionary database design, the schema is treated as a living document that can be updated and modified as needed. If you want to go deep into this topic, we recommend reading the Martin Fowler's page on the subject.

Why Migrations?

Migrations are a way to manage the evolution of the database schema in a controlled and repeatable way. They allow you to define the changes that need to be made to the schema in a series of files that can be run in sequence. This makes it easy to track changes to the schema over time and to apply those changes to multiple environments, such as development, staging, and production.

Surveying All The Types of Schema Changes

Graph databases are schema-less, but the data model is still defined by the relationships between nodes and edges and the properties of those nodes and edges. This means that there is still a schema to manage, even if it is not as rigid as a traditional relational database schema. Since nodestream is agnostic to the underlying database, we need to be able to support migrations for all types of databases that nodestream can work with. Therefore we need to support migrations that are designed against an abstract graph model and leave the implementation details to the specific database connector. So lets examine the types of schema changes that can exist in a graph database:

Creating New Nodes and Edges Types

The most basic type of schema change is creating new node and edge types. This is equivalent to creating a new table in a relational database. When you create a new node or edge type, you may need to define the properties that it will have and the relationships that it will have with other nodes and edges.

Depending on the underlying database, this might involve creating a new index or constraint to enforce the uniqueness of the new node or edge type.

Removing Nodes and Edges Types

Conversely, you may also need to remove existing node and edge types. This is equivalent to dropping a table in a relational database. Most graph databases do not support leaving orphaned nodes or edges, so you may need to delete all nodes and edges of the type that you are removing.

Adding Properties to Nodes and Edges

Another common type of schema change is adding properties to existing nodes and edges. This is equivalent to adding a new column to a table in a relational database. When you add a property to a node or edge, you may need to define a default value for that property or update existing nodes and edges to have a value for that property.

One tricky case is when you add a property that is part of the nodes or edges key. In this case, you may need to update the key of the node or edge to include the new property.

Removing Properties from Nodes and Edges

Conversely, you may also need to remove properties from existing nodes and edges. This is equivalent to dropping a column from a table in a relational database. When you remove a property from a node or edge, you may need to update existing nodes and edges to remove the value for that property.

Adding and Removing Indexes

Another common type of schema change is adding and removing indexes. Indexes are used to speed up queries by allowing the database to quickly find nodes and edges that match certain criteria. When you add an index, you may need to define the properties that the index will be based on and the type of index that will be used. When you remove an index, you may need to update existing indexes to remove the properties that the index was based on.

Topological Changes

Finally, you may need to make topological changes to the schema such as adding or removing relationships between nodes and edges. This is equivalent to adding or removing foreign keys in a relational database.

When you change the adjancency of nodes and edges, you may want to clean up the data to ensure that it is consistent with the new schema. This may involve updating existing nodes and edges to reflect the new relationships or deleting nodes and edges that are no longer needed.

How Migrations Work in Nodestream

In nodestream, migrations are defined as a series of yaml files that describe the changes that need to be made to the schema. Each migration file contains a list of operations that need to be performed. For example, creating a new node type or adding a property to an existing node type.

When you run nodestream migrations make nodestream will create a new migration file in the migrations directory. That process works roughly like this:

  • Nodestream will look at the current state of the schema by initializing and introspecting all pipelines (A).
  • Build the state of the schema that is represented by the current migrations (B).
  • Diff the two states (A and B) to determine the changes that need to be made to the schema.
  • Generate a new migration file that describes the changes that need to be made to the schema.

When you run nodestream migrations run nodestream will apply the migrations in sequence to evolve the schema. That process works roughly like this:

  • Nodestream reads the migration files into memory and builds a graph of the dependencies between the migrations.
  • Nodestream runs the migrations in topological order, applying the changes to the schema as it goes.
  • Nodestream keeps track of which migrations have been applied so that it can skip them in the future.

Crucially, nodestream does not track all possible schema changes. Topological changes are not tracked(see here), so you will need to handle those manually. Additionally, nodestream does not support rolling back migrations, so you will need to handle that manually as well.

Are Migrations Any Good?

Wondering what Martin Fowler would think of this design given is page on the subject? He describes the concept of "evolutionary database design" with a set of characterisitcs. Some of them are more organizational than technical.

However, some of the technical ones are:

  • All Database Artifacts are Version Controlled with Application Code: Nodestream's migrations are intended to be source controlled files that are run in sequence and define their dependencies. This makes it easy to evolve changes and continuously integrate them (which is another of the characteristics).
  • All database changes are database refactorings Nodestream's migrations are a series of database refactorings that are run in sequence. This makes it easy to track changes to the schema over time and to apply those changes to multiple environments, such as development, staging, and production. We are detecting the changes that need to be made to the schema and applying them in a controlled and repeatable way.
  • Clearly Separate Database Access Code You generally don't need to write database access code in nodestream, so this is taken care of 🎆
  • Automated the Refactorings This is the main point of migrations. They are automated and can be run in sequence to evolve the schema.

We are happy with the design of the migrations in nodestream and we think that they are a good fit for the project. As we've mentioned, there are still some major evolutions to be made to migrations, such as the ability to rollback a migration, but we are confident that we are on the right track.

· 3 min read
Cole Greer

The recent release of Nodestream 0.12 has introduced support for Amazon Neptune as the first step towards broader multi-database support. Nodestream provides a flexible tool to perform bulk ETL into Amazon Neptune Database and Amazon Neptune Analytics.

This post will give a quick overview of the new Amazon Neptune support, offer some examples to get started, and list some features planned for future releases.

Overview

Support for AWS Neptune is split into two modes, DB and Analytics. Both modes leverage the AWS SDK to load data via batched openCypher queries. Nodestream is compatible with Neptune DB engine version 1.2.1.1 or higher, as well as Neptune Analytics.

Capabilities

Nodestream with Neptune currently supports standard ETL pipelines as well as time to live (TTL) pipelines. ETL pipelines enable bulk data ingestion into Neptune from a much broader range of data sources and formats than have previously been possible in Neptune.

Nodestream's TTL mechanism also enables new capabilities not previously available in Neptune. By annotating ingested graph elements with timestamps, Nodestream is able to create pipelines which automatically expire and remove data that has passed a configured lifespan.

Usage

Prerequisites

Neptune must be reachable from whichever environment you intend to run Nodestream. Both Neptune Database, as well as Neptune Analytics with a private endpoint, are restricted to VPC-only access. If you intend to use a Neptune Analytics graph with a public endpoint, no special considerations are required.

Check out the Neptune User-Guide for more information about connecting to a VPC-only host. You can test the connection with this curl command:

curl https://<NEPTUNE_ENDPOINT>:<PORT>/openCypher/status

IAM Auth

Nodestream fully supports IAM Authentication when connecting to Amazon Neptune, as long as credentials are properly configured. See the boto3 credentials guide for more instruction on correctly configuring credentials.

Configuration Examples

The connection configuration for Neptune contains a switch between two modes: db and analytics. Neptune DB mode will connect using a Neptune Database cluster or instance endpoint, while Neptune Analytics will connect via the graph identifier.

Neptune Database:

targets:
db-one:
database: neptune
mode: database
host: https://<NEPTUNE_ENDPOINT>:<PORT>

Neptune Analytics:

targets:
db-one:
database: neptune
mode: analytics
graph_id: <GRAPH_IDENTIFIER>

Check out the Nodestream basics tutorial for a complete guide to getting started with Nodestream and Neptune.

Future Roadmap

We have several new features planned to bring additional functionality in upcoming releases.

One feature we are excited to bring to the Nodestream Neptune plugin is support for the new Nodestream Migrations API. Some migrations are not applicable in Neptune as it does not use user-defined indices. However, support for applicable migrations, such as renaming properties, will be added in an upcoming release.

We are additionally planning to add expanded datatype support. Currently, the Neptune plugin supports string, boolean, and numeric types. Datetime types are automatically converted into epoch timestamps. We aim to expand this list such that any extracted types which are supported by Neptune can be loaded without casting or conversion.

Our future work will also include further performance assessments and optimizations. We will continue to optimize the generated queries in order to maximize the performance and scalability of Nodestream with Neptune.

Get Involved

The inclusion of new features is heavily dependent on community feedback, if there are any additional features or configurations which you would find valuable, please create an issue on GitHub with the request.

· 5 min read
Zach Probst

We are happy to announce the release of Nodestream 0.12. This release marks the largest update to Nodestream since its inception. We've spent a lot of time improving the core of nodestream and we're excited to share it with you.

Before we get into the details, we want to thank the community for their support and feedback. As such, we have completely revamped the documentation to make it easier to use and navigate. This releases comes with two headline features Database Migrations and Multi-Database Support.

Major Features

Database Migrations

In the past, nodestream attempted to automatically create indexes and constraints on the database based on your pipeline at runtime. This was done by introspecting the schema of the entire project and generating the appropriate queries to create the indexes and constraints. This was a very powerful feature but it had a few drawbacks:

  • It was redundant. The same indexes and constraints were being created with IF NOT EXISTS clauses every time the pipeline was run.
  • It was slow. The queries were being executed serially and the pipeline was locked until they were all completed.
  • It was error prone. If the database was not in a state that allowed for the creation of the indexes and constraints, the pipeline would fail.
  • It was high friction. There was no way to refactor the database without manual intervention. If the schema changed, the pipeline would fail and the user would have to manually remove the indexes, constraints, and sometimes data before running the pipeline again.

To address these issues, nodestream 0.12 has introduced the concept of migrations. Migrations are a way of encapsulating changes to the database schema in a way that can be applied incrementally. Conceptually, they are similar to the migrations in the Django, Rails, Neo4j Migrations, and Flyway frameworks.

Database Migrations

Migrations are defined in a directory called migrations in the root of your project. Each migration is a yaml file that contains data about the migration and its dependencies. You can create migrations by running the nodestream migrations make command.

Check out the changes to the tutorial on Database Migrations as well as the new tutorial on Working With Migrations to learn more.

Core Contributors to this feature include:

Multi-Database Support

Prior to this release, the only database that was supported was neo4j. While this is a category leading database, the goal of nodestream is to be database agnostic and afford developer the ability to use the database or databases that best fits their needs. As such, we are happy to announce that nodestream now supports Amazon Neptune and Amazon Neptune Analytics. TO accommodate that, we have moved the neo4j database connector into a separate package called nodestream-plugin-neo4j and added a new package called nodestream-plugin-neptune.

Starting with this release, you use the --database flag to generate neptune boilerplate configuration.

Database Migrations

Check out the docs on it here.

Core Contributors to this feature include:

Other Features

Parquet Support

Many customers have data stored in parquet format. Parquet is a columnar storage format that is optimized for reading and writing large datasets. We are happy to announce that nodestream now supports parquet as a first class citizen.

Check out the docs on it here.

Core Contributors to this feature include:

Include Properties From Maps

In the past, each property you wanted to include in the pipeline had to be explicitly defined in the pipeline configuration. This was a bit cumbersome and error prone. Starting with this release, you can now include all properties by defining an expression that returns a map at the properties key directly instead of a mapping of property names to expressions.

For example, here are two examples on the properties and source_node interpretations:

- type: source_node
node_type: User
key:
email: !jmespath email
properties: !jmespath path.to.properties.mapping
normalization:
do_trim_whitespace: true
- type: properties
properties: !jmespath path.to.properties.mapping
normalization:
do_lowercase_strings: true

Check out the docs on it here.

Core Contributors to this feature include:

Performance Improvements

We've made a small number of performance improvements to the core of nodestream that should result in faster processing times and lower memory usage. Most notably, we've cache the last_ingested_at timestamp for nodes and relationships to reduce the number of times we create objects in memory. We've observed a 10% improvement in processing times and a 5% reduction in memory usage in our testing.

Core Contributors to this feature include:

· 8 min read
Dave Bechberger

Note: Both the Nodestream Neptune and Nodestream SBOM plugins are currently preview releases

Recently, (March 2024) a severe vulnerability was found to have been added to a common library, XZ utility. Unfortunately, serious software vulnerabilities are not isolated incidents, as in late 2021, a critical security vulnerability was discovered in a commonly used logging library, Log4j. While the origin of the issues differ, Log4j was an oversight while XZ was an explicit backdoor, the outcome for users was the end same. Once each vulnerability was known, companies and individuals spent many hours combing through countless applications, looking for and patching systems running vulnerable versions of the software.

As this effort was ongoing, many were asking, "Isn't there a better way to track this information?"

In this post, we will discuss the work we have been doing around creating a plugin for Nodestream that provides a unified graph model for SBOMs ingestion and analysis. We will combine this with the plugin for Amazon Neptune to demonstrate how you can find insights for software vulnerabilities in application stacks. Let’s first talk a bit about what an SBOM is and why you should use a graph for analysis.

What is a Software Bill of Materials (SBOM) and why use Graphs

A software bill of materials (SBOM) is a critical component of software development and management, helping organizations to improve the transparency, security, and reliability of their software applications. An SBOM acts as an "ingredient list" of libraries and components of a software application that:

  • Enables software creators to track dependencies within their applications
  • Provides security personnel the ability to examine and assess the risk of potential vulnerabilities within an environment
  • Provides legal personnel with the information needed to assure that a particular software is in compliance with all licensing requirements.

A software bill of materials (SBOM) is a comprehensive list of the components, libraries, and dependencies used in a software application or system. It provides a detailed breakdown of the software's architecture, including the names, versions, licenses, and optionally the vulnerabilities of each component and describes the complex dependencies and relationships between components of a software system, including multi-level hierarchies and recursive relationships.

Graphs are excellent for modeling these kinds of interconnected relationships, with nodes representing components and edges representing dependencies and relationships between these components. Graph data structures handle recursive relationships very naturally, making it easy to analyze networks and flows. Using graph algorithms and metrics, allows you to analyze and identify critical components and dependencies, single points of failure, security vulnerabilities, license compatibilities, etc. for use cases such as:

  • Dependency graphs - These show how different components in the software relate to and depend on each other. Graphs make these complex relationships easier to visualize.
  • Vulnerability Graphs - Graphs make it easy to determine and assign associated risks with different vulnerabilities to prioritize fixing known issues.
  • Supply chain graphs - SBOMs trace the components and dependencies up the software supply chain. Graphs can illustrate the flow of open-source components from lower-level suppliers up to the final product. This helps identify vulnerabilities or licensing issues in the supply chain.

How to use Graphs for SBOM analysis

While using graphs to assist with SBOM analysis is not new, it also has not been trivial to get the data loaded in due to differing formats, with the two most popular being CycloneDX and SPDX. To assist with the data loading and analysis, I recently worked on an SBOM plugin for Nodestream to provide a simple way to load SBOMs into an opinionated graph data model from local files, GitHub, or Amazon Inspector. Nodestream is a Python framework for performing graph database ETL. The SBOM plugin extends this framework to provide a

Loading Data into SBOMs into our Graph

To get started loading your SBOM files into Amazon Neptune, we first need to setup an Amazon Neptune Analytics Graph as well as a Neptune Notebook to perform our analysis. To configure a Neptune Analytics Graph you can follow the documentation here: https://docs.aws.amazon.com/neptune-analytics/latest/userguide/create-graph-using-console.html

Neptune Notebooks is a managed open-source graph-notebook project provides a plethora of Jupyter extensions and sample notebooks that make it easy to interact with and learn to use a Neptune Analytics graph. This can be configured using the documentation here: https://docs.aws.amazon.com/neptune-analytics/latest/userguide/notebooks.html

Now that we have setup our database and analysis environment we next need to install the Nodestream plugins for Neptune and SBOM.

pip install -q pyyaml nodestream-plugin-neptune nodestream-plugin-sbom

With those data files installed, all we need to do is set our configuration in the nodestream.yaml file as shown below. In this example, we are going to load the SBOM files for Nodestream, the Nodestream Neptune Plugin, and the Nodestream SBOM plugin into our database, directly from GitHub.

plugins:
- name: sbom
config:
repos:[nodestream-proj/nodestream, nodestream-proj/nodestream-plugin-sbom, nodestream-proj/nodestream-plugin-neptune]
targets:
my-neptune:
database: neptune
graph_id: g-<GRAPH ID>
mode: analytics

With our configuration setup, we can run the import using the following command:

nodestream run sbom_github --target my-neptune

After we run the data load, we get a graph that similar to the image below.
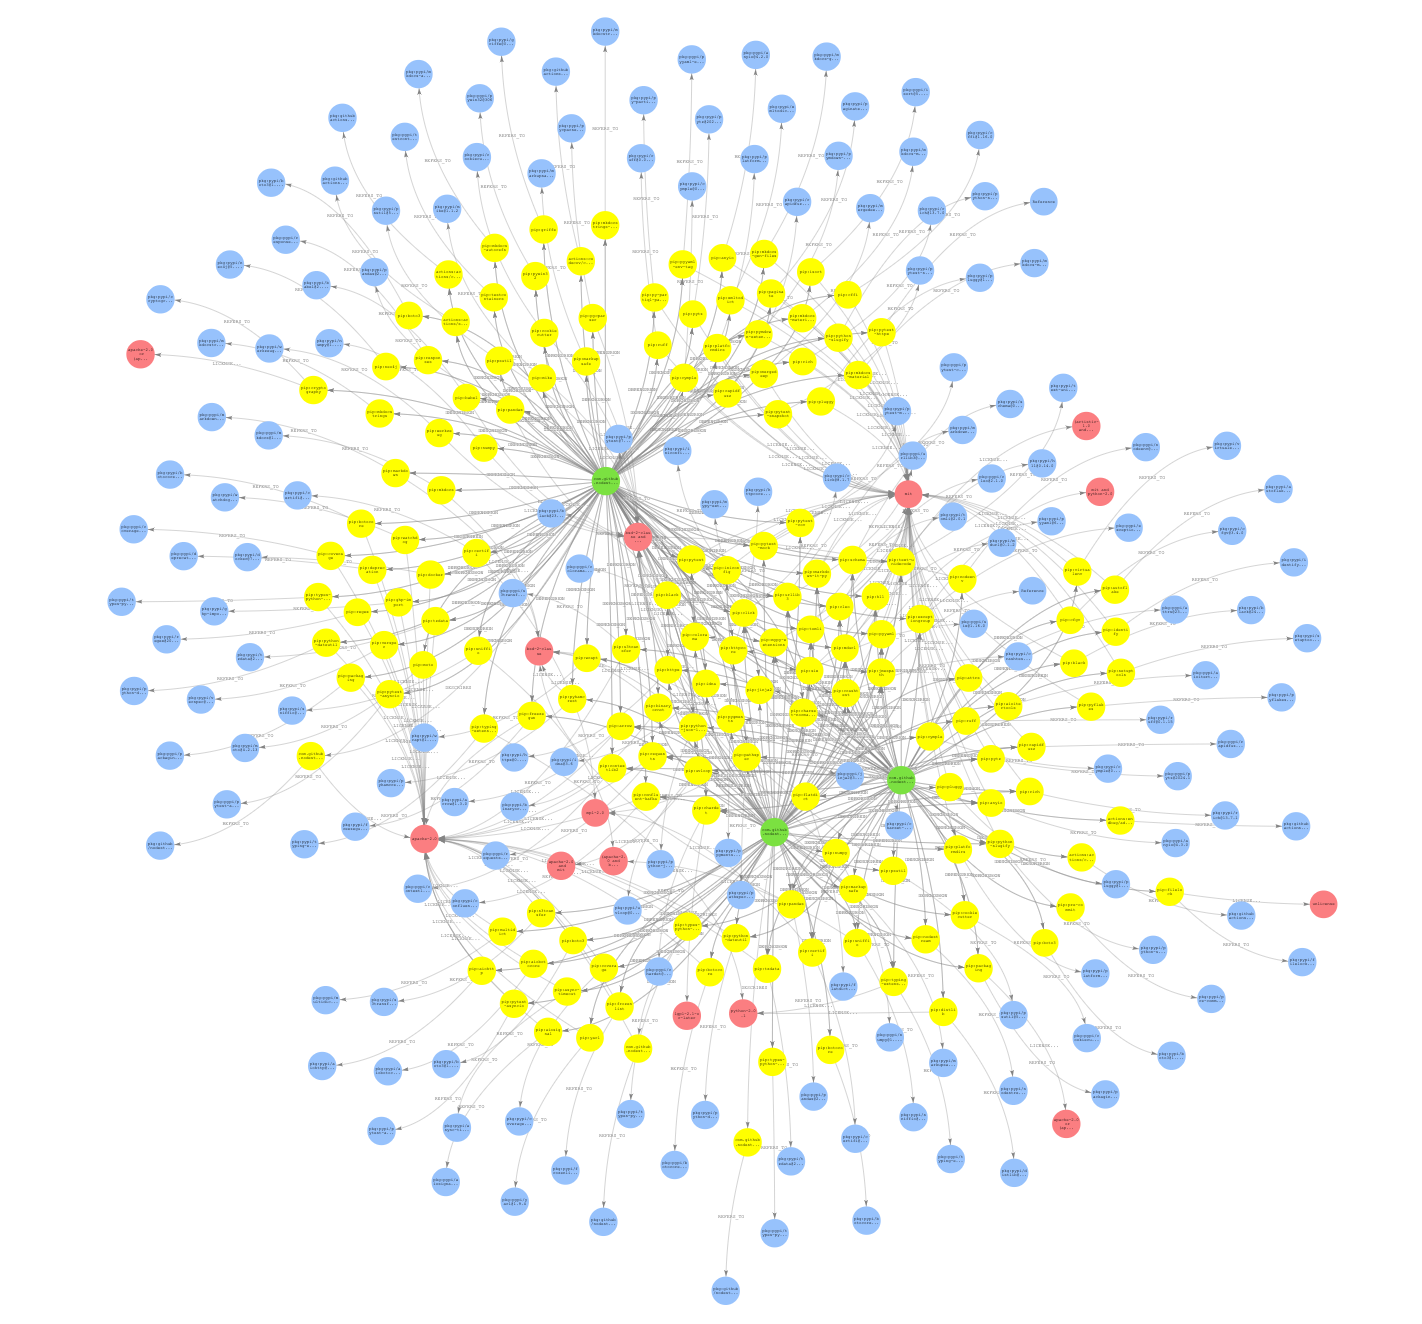
SBOM Model Overview

What does our graph look like?

Let’s take a look at the types of data that we are storing in our graph. The plugin uses the opinionated graph data model shown below to represent SBOM data files. SBOM Graph schema This model contains the following elements:
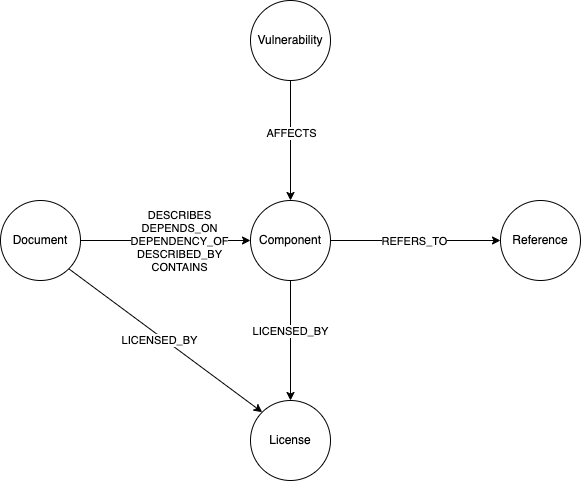
Node Types

  • Document - This represents the SBOM document as well as the metadata associated with that SBOM.
  • Component - This represents a specific component of a software system.
  • Reference - This represents a reference to any external system which the system wanted to include as a reference. This can range from package managers, URLs to external websites, etc.
  • Vulnerability - This represents a specific known vulnerability for a component.
  • License - The license for the component or package.

Edge Types

  • DESCRIBES/DEPENDS_ON/DEPENDENCY_OF/DESCRIBED_BY/CONTAINS - This represents the type of relationship between a Document and a Component in the system.
  • REFERS_TO - This represents a reference between a Component and a Reference
  • AFFECTS - This represents that a particular Component is affected by the connected Vulnerability

The properties associated with each element will vary depending on the input format used, and the optional information contained in each file.

Analyzing SBOMs

Now that we have our data loaded into our graph, the next step is to start to extract insights into what is actually important in our SBOM data.

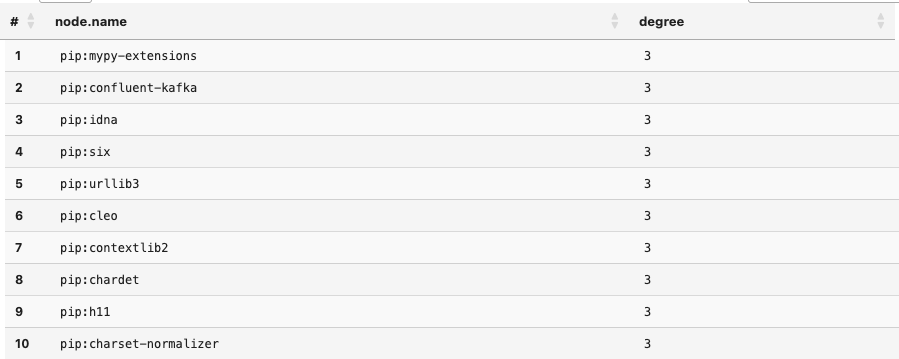
One common use case is to investigate shared dependencies across projects. Shared dependencies allow development and security teams to better understand the security posture of the organization through identification of shared risks. Let's start by taking a look at the most shared dependencies between these projects using the query below.

MATCH (n:Component)
WHERE exists(n.name)
CALL neptune.algo.degree(n, {traversalDirection: 'inbound', edgeLabels: ['DEPENDS_ON']})
YIELD node, degree
RETURN node.name, degree
ORDER BY degree DESC
LIMIT 10

Running this query will show us that there are quite a few dependencies that are shared across all three projects. To do this analysis, we used a graph algorithm known as Degree Centrality which counts the number of edges connected to a node. This measure of how connected the node is can in turn indicate the node's importance and level of influence in the network. Results Running the query below shows us that there are 31 Components that are shared across all the projects.
MATCH (n:Component)
WHERE exists(n.name)
CALL neptune.algo.degree(n, {traversalDirection: 'inbound', edgeLabels: ['DEPENDS_ON']})
YIELD node, degree
WHERE degree=3
RETURN count(node)

Given that this is a closely connected group of projects, it is not a surprise that there are many shared components. Given that one of the strengths of graphs is the ability to visualize the connectedness between data, let’s take a look at how they are connected.

MATCH (n:Component)
WHERE exists(n.name)
CALL neptune.algo.degree(n, {traversalDirection: 'inbound', edgeLabels: ['DEPENDS_ON']})
YIELD node, degree
WHERE degree = 3
WITH node, degree
MATCH p=(node)-[]-()
RETURN p
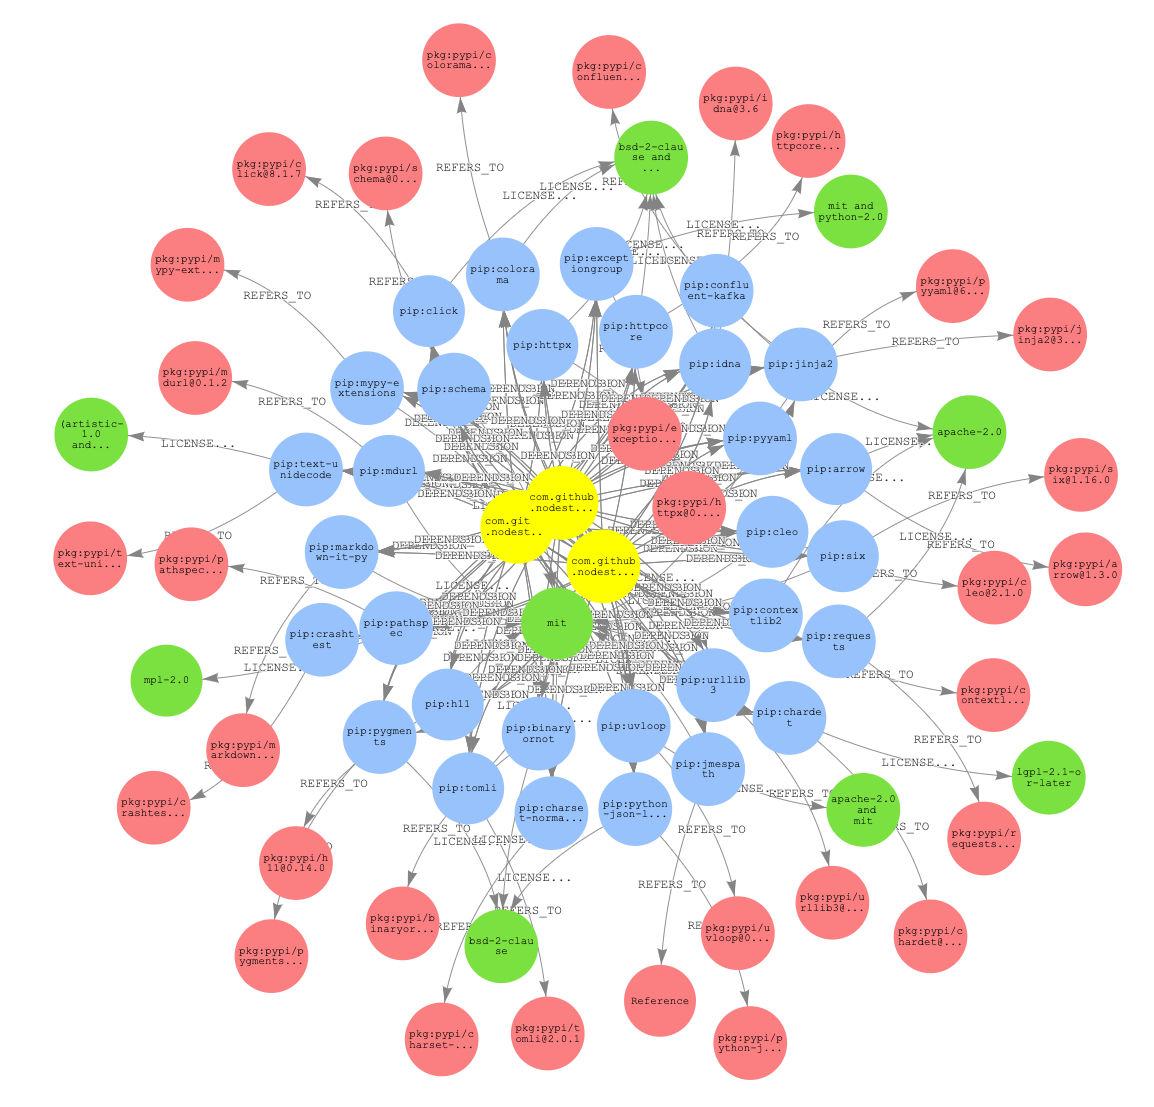
Results

Another common use case is to investigate licensing across multiple projects. This sort of investigation benefits from the connectedness across the graph by leveraging the connectedness to find how component licenses are connected to each other. Let’s take a look at what other licenses are associated with the lgpl-2.1-or-later licensed components.

MATCH p=(l:License)<-[:LICENSED_BY]-(:Component)<-[:DEPENDS_ON]-(:Document)
-[:DEPENDS_ON]->(:Component)-[:LICENSED_BY]->(l2)
WHERE l.name = 'lgpl-2.1-or-later' and l<>l2
RETURN DISTINCT l2.name
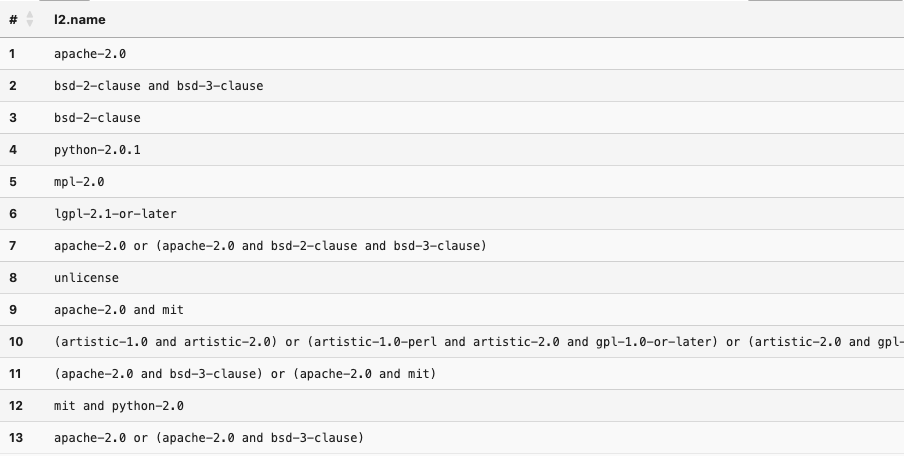
Results

As we see, there are quite a few other licenses used in these projects. We can leverage the visual nature of graph results to gain some insight into how components are connected. In this case, let’s see how components with the lgpl-2.1-or-later are connected to components with the unlicense.

MATCH p=(l:License)←[:LICENSED_BY]-(:Component)←[:DEPENDS_ON]-(:Document)
-[:DEPENDS_ON]→(:Component)-[:LICENSED_BY]→(l2)
WHERE l.name = 'lgpl-2.1-or-later' and l<>l2
RETURN DISTINCT l2.name
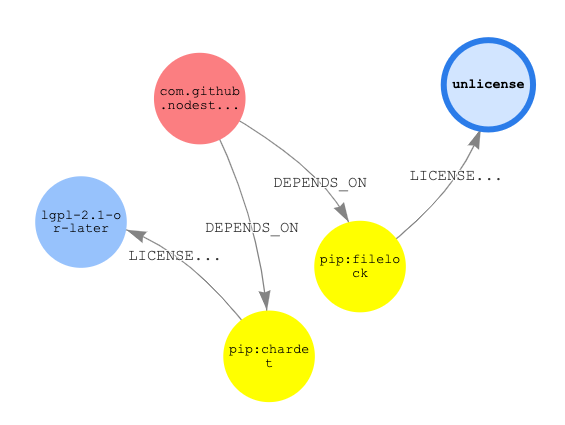
Results

We see that there exists one path in our graph between these two licenses.

Next Steps

As we have seen, using graphs to perform analysis of SBOM data can be a powerful tool in your toolbox to gain insights into the connections between software projects. What I have shown here is only the beginning of the types of analysis you can perform with this data. For a more detailed walkthrough of using graphs for SBOM analysis, I recommend taking a look at the following notebooks:

SBOM Dependency Analysis SBOM Vulnerability Analysis

· One min read
Zach Probst

Welcome to the new nodestream documentation and project site! We are excited to share with you the new features and improvements we have been working on.

We have been working hard to improve the documentation and make it easier to use and navigate. We have also been working on improving the project site to make it easier to find the information you need.

We hope you find the new documentation and project site helpful and easy to use!

By the way, thanks to the Docusaurus team for creating such a great tool!

If you have any questions or feedback, please feel free to reach out to us on GitHub!